On Premise Setup
Hardware requirements
Hardware requirements are highly dependent on the number of active users simultaneously working on documents inside the single SMASHDOCs installation. Under the active user we understand the user who is typing text in the Editor, using copy-paste, moving sections around, writing comments and so on.
Minimal hardware requirements are: One server/VM with latest version of Ubuntu, CentOS, Redhat, Debian or any other Linux 64-bit distribution, 2 CPU cores, 10GB RAM, 160GB storage (SSD is preferred)
Our performance tests with version 2.23.4 are showing following results regarding required hardware in term of active users count:
Number of active users |
CPU |
RAM |
Storage |
|---|---|---|---|
20 |
2 cores |
10GB |
160GB storage, SSD is preferred |
50 |
4 cores |
12GB |
160GB storage, SSD is preferred |
100 |
8 cores |
16GB |
160GB storage, SSD is mandatory |
300 |
16 cores |
32GB |
160GB storage, SSD is mandatory |
>300 |
Please contact support@smashdocs.net |
||
Software Requirements
To setup a SMASHDOCs On-premise installation you will need:
Access to the private SMASHDOCs docker hub repository (Please contact support@smashdocs.net)
Docker engine (Version > 17.05.0-ce)
Docker compose (Version > 1.21.2)
SSL certificates for your Domain
Your business logos in the correct sizes:
default_logo |
|
brand_logo |
|
email_logo |
|
favicon |

|
Docker engine is required to complete this installation. We deliver our services as docker containers, so this is a prerequisite for running SMASHDOCs. If you do not already have docker installed, obtain docker engine on your operating system of choice.
Docker compose is a required tool to compose and orchestrate the SMASHDOCs environment. If you do not already have docker compose installed, obtain docker compose on your operating system of choice.
Docker Compose set-up
System Architecture
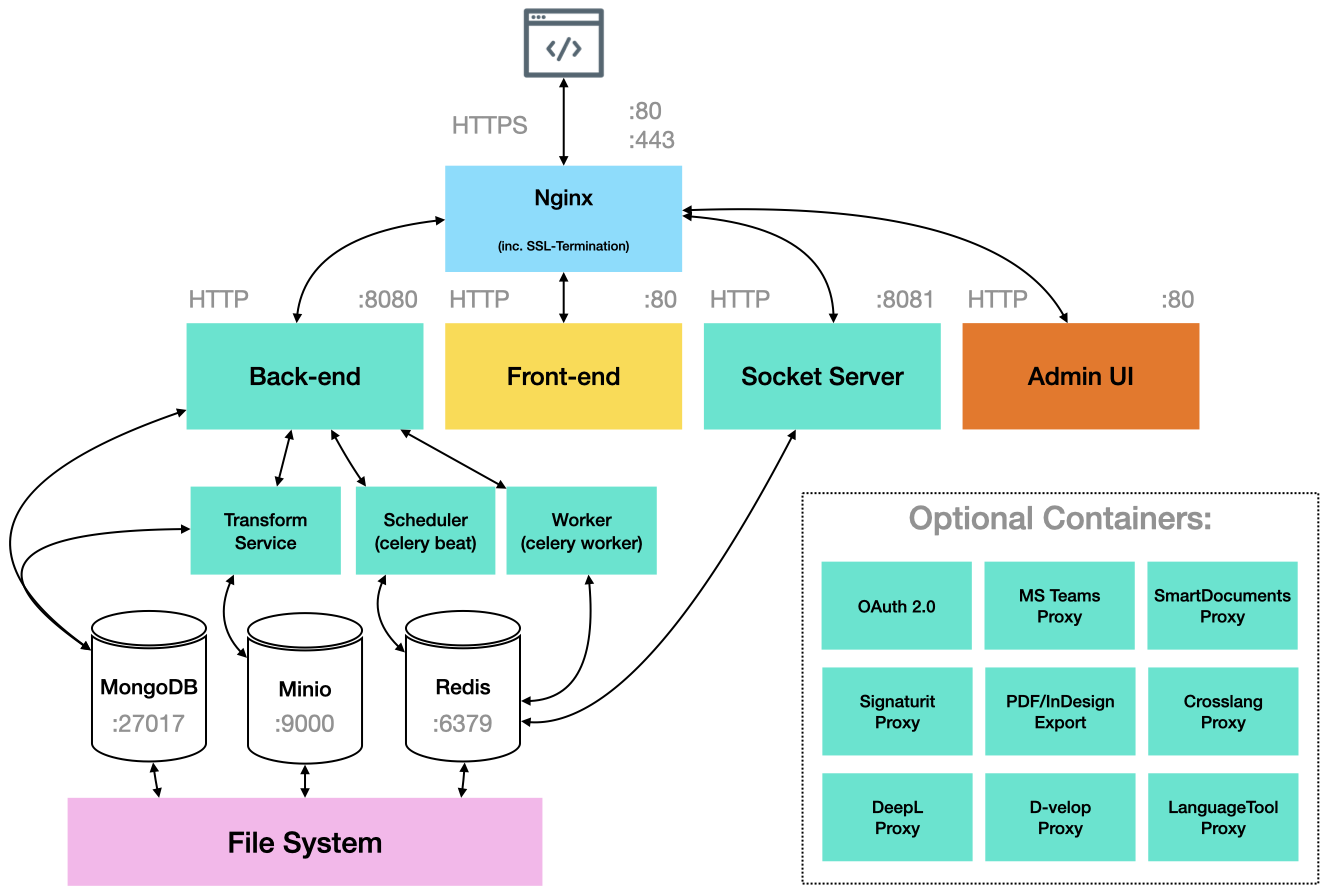
- A basic SMASHDOCs installation consists of the following few docker images:
mongo:4.4
redis:5
registry.smashdocs.net/smashdocs/nginx:2.23.4 A standard Nginx Webserver Version 1.17.4 with an nginx-upload-module and the SMASHDOCs nginx config file
registry.smashdocs.net/smashdocs/backend:2.23.4 The SMASHDOCs Backend which will be used in 4 Docker Containers (Beat, Worker, Backend)
registry.smashdocs.net/smashdocs/frontend:2.23.4 The SMASHDOCs Frontend
registry.smashdocs.net/smashdocs/socketserver:2.23.4 The SMASHDOCs Socket Server
registry.smashdocs.net/smashdocs/minio:latest Asset management
To ensure an easy setup of a SMASHDOCs installation, we are providing a docker compose file: <setup.html#docker-container-setup>. This docker compose file will spawn all docker containers which are needed for one SMASHDOCs Instance.
Certificates
SMASHDOCs can be served via SSL (by default) or as a plain HTTP.
For the SSL setup (it can be a wildcard certificate or any other) you must ensure that your SSL certificates are placed in the the /opt/smashdocs/certs/ folder.
In our example below we use wildcard.crt and wildcard.key names, but it can be any other name. Just be sure the correct name is used in compose environment variable (nginx-proxy container).
For plain HTTP Setup (for example in a case of external Load Balancer) please set following environment variable in nginx-proxy container:
If you don’t have signed SSL certificates at hand you can generate a self-signed certificate as follows:
Hint
If you dont have SSL certs and quickly need to create some selfsigned ones try:
$(Host) cd /tmp $(Host) openssl req -x509 -newkey rsa:2048 -keyout wildcard.key -out wildcard.crt -days XXX -nodes -subj “/C=DE/ST=Bayern/L=Muenchen/O=Smashdocs Example/OU=Org/CN=*.smashdocs.local”
$(Host) mkdir -p /opt/smashdocs/certs/
$(Host) cp -R /tmp/* /opt/smashdocs/certs/
Traffic Routing and required web servers
SMASHDOCs is using Nginx to route and to server all the traffic to an application.
1: Nginx: The “Nginx-Proxy” docker container accepts incoming TCP (Port 4434) and HTTP (Ports 80, 443) traffic and is responsible for the SSL termination (or not in a case of SSL protocol is disabled). SMASHDOCs ships the NGINX-Proxy with a default nginx.config for easy installation and usage. Some of the properties in the Nginx default config will be overwritten by defining the environment variables by the docker entryfile.
2: Frontend The “frontend” docker container serves the frontend HTML, CSS and JavaScript code served by Nginx
3: Backend The “backend” docker container serves the backend. The backend traffic is routed by Nginx
4: Socket Server The “socketserver” docker container serves the socket server. The socket server traffic is routed by Nginx
Docker container setup
The docker-compose.customer.yml file is an example docker compose file which sets up a SMASHDOCs Installation. If you setup you own SMASHDOCs instance, make sure you change the configuration accordingly to your desired domain.
Download: docker-compose.customer.yml
version: "2.4"

networks:
  customer:

volumes:
  mongo-data:
  minio-data:

services:
  nginx-proxy:
    image: "registry.smashdocs.net/smashdocs/nginx:2.23.4"
    mem_limit: 256m
    user: root
    restart: always
    volumes:
      - "/opt/docker/ssl/certs:/etc/nginx/certs:ro"
    environment:
      - "SSL_CERT=wildcard.crt"
      - "SSL_KEY=wildcard.key"
    networks:
      - customer
    ports:
      - 80
      - 443
      - 4434

  frontend:
    image: "registry.smashdocs.net/smashdocs/frontend:2.23.4"
    mem_limit: 256m
    user: root
    restart: always
    networks:
      - customer
    environment:
      - "SERVICE_NAME=customer-frontend"
      - "API_URL=https://customer.smashdocs.net/api"
      - "API_KEY=<API_KEY>"
      - "ERRORREPORTING_ENABLED=true"
      - "ERRORREPORTING_SENTRY_DSN=<ERRORREPORTING_SENTRY_DSN>"
      - "ERRORREPORTING_SENTRY_SERVER_NAME=customer-frontend"
      - MODE=${MODE_customer:-normal}
      - "SMARTDOCUMENTS_BRANDING=legal"

  adminui:
    image: "registry.smashdocs.net/smashdocs/admin-ui:2.23.4"
    mem_limit: 256m
    user: root
    restart: always
    networks:
      - customer
    environment:
      - "API_URL=https://customer.smashdocs.net/api"

  backend:
    image: "registry.smashdocs.net/smashdocs/backend:2.23.4"
    mem_limit: 5g
    user: root
    restart: always
    networks:
      - customer
    environment:
      - "DATABASE_DATABASE=customer"
      - "DATABASE_ADDRESS=mongodb://mongodb:27017/customer"
      - "API_URL_API_URL=https://customer.smashdocs.net/api"
      - "HTTP_SERVER_ADDRESS=http://customer.smashdocs.net"
      - "HTTP_SERVER_SSL_ADDRESS=https://customer.smashdocs.net"
      - "ERRORREPORTING_REPORTING_ENABLED=true"
      - "ERRORREPORTING_SENTRY_DSN=<ERRORREPORTING_SENTRY_DSN>"
      - "ERRORREPORTING_SENTRY_SERVER_NAME=customer-backend"
      - "PROVISIONING_ENABLED=true"
      - "PROVISIONING_KEY=<PROVISIONING_KEY>"
      - "EXAMPLE_DOC_ENABLED=false"
      - "EXAMPLE_DOC_USER_EMAIL=admin@smashdocs.net"
      - "EMAIL_SMTP_SERVER_ADDRESS=<EMAIL_SMTP_SERVER_ADDRESS>"
      - "EMAIL_SMTP_SERVER_PORT=<EMAIL_SMTP_SERVER_PORT>"
      - "EMAIL_SMTP_USERNAME=<EMAIL_SMTP_USERNAME>"
      - "EMAIL_SMTP_PASSWORD=<EMAIL_SMTP_PASSWORD>"
      - "LOCAL_ENABLED=true"
      - "CELERY_ENABLED=true"
      - "SYSTEM_ROLE=production"
      - "LOG_LEVEL=DEBUG"
      - "PROMETHEUS_METRICS_ENABLED=true"
      - "TRANSFORM_SERVICE_ADDRESS=transform-service:50051"
      - "SMART_DOCUMENTS_BRIDGE_ADDRESS=smart-documents-bridge:50052"
      - "SDOX2HTML_TRANSFORM_SERVICE_ADDRESS=sdox2html-transform-service:50051"
      - "SIGNATURIT_TOKEN=<SIGNATURIT_TOKEN>"
      - "CLOUDCONVERT_TOKEN=<CLOUDCONVERT_TOKEN>"
      - 'SIGNATURIT_TEMPLATE_UUID=<SIGNATURIT_TEMPLATE_UUID>'
      - "SPELL_CHECKER_LANGUAGE=en-US"
    depends_on:
      - minio
      - nginx-proxy
      - mongodb
      - redis

  socketserver:
    image: "registry.smashdocs.net/smashdocs/socketserver:2.23.4"
    mem_limit: 1g
    user: nobody
    restart: always
    networks:
      - customer
    environment:
      - "REDIS_URL=redis://redis:6379"
      - "SM_SPC_SIO_REDIS_BUS=redis://redis:6379/0"
      - "SM_SIO_BE_AUTH_URL=http://backend:8080/users/document-authenticate"
    depends_on:
      - redis
      - backend

  beat:
    image: "registry.smashdocs.net/smashdocs/backend:2.23.4"
    mem_limit: 512m
    user: nobody
    restart: always
    networks:
      - customer
    command: "beat"
    environment:
      - "SERVICE_NAME=beat-customer"
      - "SERVICE_TAGS=smashdocs,rest"
      - "CELERY_ENABLED=true"
      - "REDIS_URL=redis://redis:6379"
      - "CELERY_BEAT_SCHEDULE_PATH=/usr/local/data/celery/smashdocs_beat_schedule"
    depends_on:
      - redis

  worker:
    image: "registry.smashdocs.net/smashdocs/backend:2.23.4"
    mem_limit: 512m
    user: nobody
    restart: always
    networks:
      - customer
    command: "worker"
    environment:
      - "DATABASE_DATABASE=customer"
      - "DATABASE_ADDRESS=mongodb://mongodb/customer"
      - "DATABASE_PORT=27017"
      - "API_URL_API_URL=https://customer.smashdocs.net/api"
      - "HTTP_SERVER_ADDRESS=http://customer.smashdocs.net"
      - "HTTP_SERVER_SSL_ADDRESS=https://customer.smashdocs.net"
      - "CELERY_ENABLED=true"
      - "CELERY_BROKER=redis://redis:6379/0"
      - "CELERY_BACKEND=redis://redis:6379/0"
      - "CELERY_BEAT_SCHEDULE_PATH=/usr/local/data/celery/smashdocs_beat_schedule"
      - "MINIO_ACCESS_KEY=<MINIO_ACCESS_KEY>"
      - "MINIO_SECRET_KEY=<MINIO_SECRET_KEY>"
      - "EMAIL_SMTP_SERVER_ADDRESS=<EMAIL_SMTP_SERVER_ADDRESS>"
      - "EMAIL_SMTP_SERVER_PORT=<EMAIL_SMTP_SERVER_PORT>"
      - "EMAIL_SMTP_USERNAME=<EMAIL_SMTP_USERNAME>"
      - "EMAIL_SMTP_PASSWORD=<EMAIL_SMTP_PASSWORD>"
    depends_on:
      - mongodb
      - redis

  spellcheck:
    image: "registry.smashdocs.net/smashdocs/spellcheck:develop"
    mem_limit: 1g
    user: nobody
    restart: always
    networks:
      - customer
    environment:
      - "SERVICE_NAME=customer-spellcheck"
      - "REDIS_URL=redis://redis:6379"
      - "SM_SPC_SIO_REDIS_BUS=redis://redis:6379/0"
      - "SM_SPC_SIO_EVENT_NAME=search_results"
      - "SM_SPC_LANGUAGETOOL_URL=http://languagetool:8010/v2/check"
      - "SM_SPC_CONCURRENCY=5"
      - "SM_SPC_THREAD_POOL=5"
      - "SM_SPC_CACHE_TTL=86400"

  languagetool:
    image: "registry.smashdocs.net/smashdocs/languagetool"
    mem_limit: 3g
    cpuset: 0-3
    user: root
    restart: always
    networks:
      - customer
    environment:
      - "SERVICE_NAME=customer-languagetool"
      - "JAVA_OPTS=-Xms1024m -Xmx2

  redis:
    image: "redis:3.2"
    mem_limit: 512m
    user: redis
    restart: always
    networks:
     - customer

  mongodb:
    image: "mongo:4.4"
    mem_limit: 5g
    user: root
    restart: always
    networks:
      - customer
    ports:
      - 27017
    volumes:
      - "mongo-data:/data/db:rw"
    command: "--storageEngine wiredTiger"

  minio:
    image: "registry.smashdocs.net/smashdocs/minio:latest"
    command: server /export
    restart: always
    volumes:
      - "minio-data:/export:rw"
    networks:
      - customer
    environment:
      - "MINIO_ACCESS_KEY=<MINIO_ACCESS_KEY>"
      - "MINIO_SECRET_KEY=<MINIO_SECRET_KEY>"

  transform-service:
    image: "registry.smashdocs.net/smashdocs/transform-service:2.23.4"
    mem_limit: 4g
    networks:
      - customer
    environment:
      - "JAVA_OPTS=-Xms256m -Xmx2048m"

  sdox2html-transform-service:
    image: "registry.smashdocs.net/smashdocs/sdox2html-transform-service:2.23.4"
    user: root
    restart: always
    networks:
      - customer
External Database Setup
SMASHDOCs can be used with an existing MongoDB Database Server. In this case the dependencies in the example docker compose file above need to be removed.
The following environment variables can be used in:
Backend
Worker
Socketserver
Name |
Type |
Description |
|---|---|---|
DATABASE_ADDRESS |
String |
Database Address (default: 127.0.0.1) |
DATABASE_PORT |
String |
Database Port (default: 27017) |
DATABASE_USER |
String |
Database User (empty string for no authentication) |
DATABASE_PASSWORD |
String |
Database Password (empty string for no authentication) |
DATABASE_DATABASE |
String |
Database Name (required) |
E-Mail Server Setup
For your own SMASHDOCs installation you can use your own SMTP server to send emails to your customers. The following environment variables can be configured in:
Worker
Name |
Type |
Description |
|---|---|---|
EMAIL_ENABLED |
Boolean |
True/False value to enable or disable sending E-mail out of SMASHDOCs completely. True by default. |
EMAIL_WHITELIST |
String |
E-mail whitelist pattern (e.g. =.+smashdocs[.]net) to whitelist all outgoing E-mail traffic. No while-list by default. |
EMAIL_SMTP_SERVER_ADDRESS |
String |
E-Mail SMTP Address (default SMASHDOCs Mail Server) |
EMAIL_SMTP_SERVER_ADDRESS |
String |
E-Mail SMTP Address (default SMASHDOCs Mail Server) |
EMAIL_SMTP_SERVER_PORT |
String |
E-Mail SMTP Port (default 587) |
EMAIL_SMTP_USERNAME |
String |
SMTP Username (empty string for no authentication) |
EMAIL_SMTP_PASSWORD |
String |
SMTP Password (empty string for no authentication) |
EMAIL_STANDARD_EMAIL |
String |
Sender E-Mail Address (default: no-reply@smashdocs.net) |
EMAIL_STANDARD_FROM |
String |
Sender E-Mail Display Text (default: SMASHDOCs Team) |
Spell-checker Setup
To set the default document language, in the docker-compose.yml file in the backend container, you need to add the variable SPELL_CHECKER_LANGUAGE=en-US, where any language can be substituted for en-US (de-DE, fr-FR, …)
Step 1: Prepare the configuration
Copy the Docker compose example setup file from above and place it to your hosts file system as /opt/docker-compose/docker-compose.smashdocs.yml.
The example configuration contains the domains
smashdocs.example.com
These should be changed to reflect your environments needs.
$(Host) sed -i -- "s/customer.smashdocs.net/smashdocs.yourdomain.net/g" /opt/docker-compose/docker-compose.smashdocs.yml
Step 2: Replace the Provisioning key
SMASHDOCs has a Provisioning API (provisioning.html) which can be used to configure a SMASHDOCs installation. The provisioning key is a random key a partner can choose by himself and enable/disable to his needs.
For security reasons we advice to enable the Provisioning API only if need.
In this example setup the provisioning key is generated using a python expression piped by sha256sum and written to the ``PROVISIONING_KEY` env variable
$(Host) export PROVISIONING_KEY=`python -c "import random; print random.randint(5,1000000)" | sha256sum | awk '{print $1}'`
$(Host) sed -i -- "s/REPLACE_PROVISIONING_KEY/$PROVISIONING_KEY/g" /opt/docker-compose/docker-compose.smashdocs.yml
Step 3: Replace the Minio Credentials
SMASHDOCs uses Minio Asset Management for storing files (e.g. images, templates or inline files). Minio credentials are random pair of strings.
In this example setup the Minio credentials are generated using a bash expression and written to the MINIO_ACCESS_KEY and MINIO_SECRET_KEY env variables
$(Host) MINIO_ACCESS_KEY=$(head /dev/urandom | LC_ALL=C tr -dc A-Za-z0-9 | head -c 16)
$(Host) MINIO_SECRET_KEY=$(head /dev/urandom | LC_ALL=C tr -dc A-Za-z0-9 | head -c 32)
$(Host) sed -i -- "s|<MINIO_ACCESS_KEY>|$MINIO_ACCESS_KEY|g" /opt/docker-compose/docker-compose.smashdocs.yml
$(Host) sed -i -- "s|<MINIO_SECRET_KEY>|$MINIO_SECRET_KEY|g" /opt/docker-compose/docker-compose.smashdocs.yml
Step 4: Select the Frontend MODE
SMASHDOCs can be run in 2 different modes: Standalone and Partner mode.
1. In Standalone mode (config variable "MODE=normal") a user can create an account and login. The user will see a document list and can create and open documents
2. In Partner mode (config variable "MODE=partner") the system can only be accessed via the Partner API <api_guide.html>
frontend:
  ...
  environment:
    ...
    - "MODE=normal"
    - "MODE=partner"
Step 5: Authenticate with Dockerhub
This step requires a contract with SMASHDOCs. The containers which are required to run a SMASHDOCs environment are located in a protected private registry. Please contact SMASHDOCs if you require authentication.
$(Host) docker login -u <partneruser> -p <partnerpassword> registry.smashdocs.net
Step 6: Run the docker compose file
On the host system run the following:
$(Host) /usr/local/bin/docker-compose -f /opt/docker-compose/docker-compose.smashdocs.yml -p smashdocs up -d
Wait until all docker containers are spawned. See running docker containers using:
$(Host) /usr/local/bin/docker-compose -f /opt/docker-compose/docker-compose.smashdocs.yml -p smashdocs ps
Any changes to the compose file will be re-run on the specific parts of the configuration on consecutive executions. Docker compose will restart the changed service and dependant services.
Step 7: Configure the DNS
The domain names chosen above are required to be resolvable from hosts using the SMASHDOCs system. For different customers this step will be quite different. SMASHDOCs consultation can be acquired.
Kubernetes setup for Azure (AKS)
This guide describes Kubernetes cluster provisioning using Azure managed kubernetes-as-a-service (AKS), and SMASHDOCs app install on Kubernetes (k8s) cluster.
The main architectural considerations are:
all SMASHDOCs app components: frontend, adminui, backend, socketserver, beat, worker, nginx, redis, mongodb are running in k8s cluster
one k8s pod running one SMASHDOCs app component
one k8s service is created for each SMASHDOCs app component
nginx ingress controller is used for http/https termination
kube-lego is used for SSL certificate generation
persistent data stored at Azure storage, using Disk Storage and Azure Files services
At the end of this guide you will have working instance of SMASHDOCs app in Azure cloud with public HTTPS access.
Install CLI utilities
The following prerequisites are required for installing AKS
az- azure CLI utilitykubectl- Kubernetes CLI utilityhelm- Kubernetes package manager clientjq- JSON parsing utility
Step to install on MacOS:
$ brew install azure-cli
$ brew install kubernetes-cli
$ brew install kubernetes-helm
$ brew install jq
in Linux use appropriate package manager, apt/yum
Prerequisite steps
Before creating k8s AKS cluster, we need to make changes in our Azure account:
sign in using
azCLI utilityenable write permissions for Azure account
register Azure providers in namespaces: Compute, Network, Storage
Those steps are done once, before cluster creation.
Sign in using az CLI utility. This step is required for further
Azure resource provisioning from CLI.
$ az login
To sign in, use a web browser to open the page https://aka.ms/devicelogin and enter the code B4JGSFDGSV to authenticate.
Enable write permissions as described here - https://docs.microsoft.com/en-us/azure/azure-resource-manager/resource-group-create-service-principal-portal
Make sure that Azure providers available from your account, have proper permissions for cloud resource provisioning. This command will list available Azure providers with respective status - Registered/NotRegistered
$ az provider list --query "[].{Provider:namespace, Status:registrationState}" --out table
The providers need to be registered in following namespaces: Compute, Network, Storage to be able to create resources.
# register providers in namespaces
$ az provider register --namespace Microsoft.Compute
$ az provider register --namespace Microsoft.Network
$ az provider register --namespace Microsoft.Storage
Create K8S in AKS
Azure Kubernetes Service is supported on following locations:
East US
West Europe
Central US
Canada Central
Canada East
Check https://docs.microsoft.com/en-us/azure/aks/container-service-quotas for updates
You need to choose Azure location, in which SMASHDOCs app in AKS will be deployed. List short names for all locations, and pick short name for desired one.
# list short name for all Azure locations
$ az account list-locations | jq .[].name
We will use canadacentral
Pick desired resource group name and create it in Azure location, we
will use k8s-cc-gr as group name and create resources group in
Canada Central Azure location.
# list resource groups you already have
$ az group list

# create resource group at desired location for AKS deployment
$ az group create --name k8s-cc-gr --location canadacentral

# make sure it's created
$ az group list

# show newly created group details
$ az group show  --name k8s-cc-gr
Choose node flavor at Azure website - https://docs.microsoft.com/en-us/azure/virtual-machines/windows/sizes-general
We will use Standard_B2ms node flavor - 2 vCPU, 8G RAM, 16G SSD
Pick a name for k8s cluster, we will use k8s-cc-test Following
command will create it with specified name, node count, and node flavor.
It may take some time to finish provisioning.
# create k8s cluster
$ az aks create --resource-group k8s-cc-gr --name k8s-cc-test --node-count 3 --node-vm-size Standard_B2ms --generate-ssh-keys

# show details about newly created cluster
$ az aks show --resource-group k8s-cc-gr --name k8s-cc-test

[JSON output with k8s Azure location, name, provisioningState, resourceGroup]
Look for JSON keys "provisioningState": "Succeeded" in output, it
means cluster is ready to use.
Get k8s cluster credentials
To use k8s cluster we need to get it’s credentials (certificates), this
command will put it in kubectl config located at
$HOME/.kube/config
# get k8s credentials and merge it to kubectl config
$ az aks get-credentials -g k8s-cc-gr -n k8s-cc-test
k8s cli tool kubectl allows managing multiple k8s cluster,
local/dev/staging/prod for example, in this step we will view available
k8s cluster contexts, select context for future use, and check cluster
connectivity
# view available contexts
$ kubectl config get-contexts
*         k8s-cc-test      k8s-cc-test   clusterUser_k8s-cc-gr_k8s-cc-test

# use specified context
$ kubectl config use-context k8s-cc-test
Switched to context "k8s-cc-test".

# view cluster nodes
$ kubectl get nodes
NAME                       STATUS    ROLES     AGE       VERSION
aks-nodepool1-24768417-0   Ready     agent     20h       v1.9.6
aks-nodepool1-24768417-1   Ready     agent     20h       v1.9.6
aks-nodepool1-24768417-2   Ready     agent     20h       v1.9.6

# view cluster pods (containers)
$ kubectl get pods --all-namespaces
NAMESPACE     NAME                                    READY     STATUS    RESTARTS   AGE
kube-system   azureproxy-79c5db744-2xp79              1/1       Running   2          20h
kube-system   heapster-55f855b47-q9qxn                2/2       Running   0          20h
kube-system   kube-dns-v20-7c556f89c5-7pwxh           3/3       Running   0          20h
kube-system   kube-dns-v20-7c556f89c5-g7v6g           3/3       Running   0          20h
kube-system   kube-proxy-96qbk                        1/1       Running   0          20h
kube-system   kube-proxy-x9vms                        1/1       Running   0          20h
kube-system   kube-svc-redirect-84wq8                 1/1       Running   0          20h
kube-system   kube-svc-redirect-cnn77                 1/1       Running   0          20h
kube-system   kubernetes-dashboard-546f987686-99xd7   1/1       Running   4          20h
kube-system   tunnelfront-646d798b4-dkrxc             1/1       Running   0          20h

# view cluster info
$ kubectl cluster-info
Kubernetes master is running at https://k8s-cc-tes-k8s-cc-gr-2acabf-255c18b1.hcp.canadacentral.azmk8s.io:443
Heapster is running at https://k8s-cc-tes-k8s-cc-gr-2acabf-255c18b1.hcp.canadacentral.azmk8s.io:443/api/v1/namespaces/kube-system/services/heapster/proxy
KubeDNS is running at https://k8s-cc-tes-k8s-cc-gr-2acabf-255c18b1.hcp.canadacentral.azmk8s.io:443/api/v1/namespaces/kube-system/services/kube-dns:dns/proxy
kubernetes-dashboard is running at https://k8s-cc-tes-k8s-cc-gr-2acabf-255c18b1.hcp.canadacentral.azmk8s.io:443/api/v1/namespaces/kube-system/services/kubernetes-dashboard/proxy

To further debug and diagnose cluster problems, use 'kubectl cluster-info dump'.
Status Ready is OK, now nodes can take workloads.
Create Azure cloud storage account
Using AKS we can store cluster persistent data in Azure, but first we need to create Azure storage account.
Previous step will create resource group list with prefix MC - in
our case it will be MC_k8s-cc-gr_k8s-cc-test_canadacentral
$ az group list --output table

k8s-cc-gr                               canadacentral   Succeeded
MC_k8s-cc-gr_k8s-cc-test_canadacentral  canadacentral   Succeeded
Look for group matching our cluster name with MC prefix, and create
storage account with this MC-prefixed resource group, account name
must be in lowercase, and don’t have ‘-’ or ’_’ in account name.
We choose sdk8sccstorageaccount as storage account name.
# create Azure storage account
$ az storage account create --resource-group MC_k8s-cc-gr_k8s-cc-test_canadacentral --name sdk8sccstorageaccount --location canadacentral --sku Standard_LRS

# show Azure storage account details
$ az storage account show --name sdk8sccstorageaccount --resource-group MC_k8s-cc-gr_k8s-cc-test_canadacentral
Kubernetes storage class provisioning
Kubernetes abstractions called StorageClass with special modes
support needs to be provisioned in cluster before installing SMASHDOCs
app:
ReadWriteOnce mode -
azure-diskStorage Class formongodbandminiovolume mode is used with mongodb and minio volume
Download: azure-disk-sc.yaml
kind: StorageClass
apiVersion: storage.k8s.io/v1
metadata:
  name: azure-disk
provisioner: kubernetes.io/azure-disk
parameters:
  skuName: Standard_LRS
  kind: Managed
  cachingmode: None
Create storage classes in k8s
# create storage class "azure-disk"
$ kubectl create -f azure-disk-sc.yaml

# display storage clasess
$ kubectl get sc
NAME                PROVISIONER                AGE
azure-disk          kubernetes.io/azure-disk   1h
Initialize k8s package manager - helm
Initialize kubernetes package manager helm server-side part, which
is called tiller, empty output is OK, it means no releases have been
installed by helm in k8s yet.
# initialize server-side pod, tiller


# wait a few moments, before server-side initialization is finished
# upgrade tiller to latest version
$ helm init --upgrade

# show helm-deployed releases
$ helm list -A

# empty output excepted, we didn't deploy anything by helm yet
$
Create k8s ingress
The standard way to receive incoming traffic in k8s is through special
component, provisioned by creating Ingress object
Install nginx k8s ingress controller to ingress-nginx namespace,
without RBAC enabled
# install nginx helm chart
$ helm install stable/nginx-ingress --namespace ingress-nginx --set rbac.create=false --set rbac.createRole=false --set rbac.createClusterRole=false
Ingress deployment will create Azure LoadBalancer, pointing to newly
created k8s cluster, we need to find out it’s public IP, and create DNS
A record - azure.smashdocs.net in our case.
Execute following command and look for EXTERNAL-IP address - it will
be first, but later will be like 40.85.221.174 - this is Azure load
balancer public IP address, this operation may take a few minutes to
complete.
$ kubectl get service  -n ingress-nginx -l app=nginx-ingress
NAME                                                TYPE           CLUSTER-IP     EXTERNAL-IP     PORT(S)                      AGE
irreverant-ladybird-nginx-ingress-controller        LoadBalancer   10.0.162.217   40.85.221.174   80:31933/TCP,443:30924/TCP   13d
Let’s assume, we want to deploy SMASHDOCs app to https://azure.smashdocs.net
Create DNS A-record pointing to EXTERNAL-IP, in our case we’ve created
azure.smashdocs.net with value 40.85.221.174
Verify that DNS provisioned correctly and k8s is working - try to open
your URL in browser or by CLI utility like curl, the following
output is expected
default backend - 404
Install all cert-manager components
Link: https://cert-manager.io/docs/installation/kubectl/
kubectl apply -f https://github.com/cert-manager/cert-manager/releases/download/v1.10.1/cert-manager.yaml
You can view some of the resources that have been installed as follows:
kubectl -n cert-manager get all
Issuer Configuration
Link: https://cert-manager.io/docs/configuration/ https://cert-manager.io/docs/tutorials/getting-started-with-cert-manager-on-google-kubernetes-engine-using-lets-encrypt-for-ingress-ssl/#7-create-an-issuer-for-lets-encrypt-staging
The first thing you’ll need to configure after you’ve installed cert-manager is an Issuer or a ClusterIssuer. Save the following content to a file called issuer-lets-encrypt.yaml, change the email field to use your email address and apply it:
# issuer-lets-encrypt.yaml
apiVersion: v1
kind: List
items:
- apiVersion: cert-manager.io/v1
  kind: ClusterIssuer
  metadata:
    name: letsencrypt-prod
  spec:
    acme:
      email: email@mail.net ❗ Replace this with your email address
      privateKeySecretRef:
        name: letsencrypt-prod
      server: https://acme-v02.api.letsencrypt.org/directory
      solvers:
      - http01:
          ingress:
            class: nginx
kubectl apply -f issuer-lets-encrypt.yaml
Install SMASHDOCs app
SMASHDOCs app can be deployed using helm chart - the templates collecton, which describes k8s components like deployments, services, volumes, configmaps, ingress, etc.
One of possible ways to organize resources (deployments, pods, volumes) in kubernetes by using namespaces. One of recommendations is to have one namespace per application.
Let’s choose namespace name - we will use azure and k8s release
name, we will use azure
Release name is optional, will be assigned to random word1-word2 value,
if not specified, can be looked up later by running helm list
SMASHDOCs helm chart can be downloaded from our public repo - https://bitbucket.org/smashdocs/helm-chart/src/master/
Actual chart content (deployment templates)located in chart archive smashdocs-x.x.x.tgz,
download, extract files, then we need to change install-specific settings, change current directory
# untar archive
$ tar zxvf smashdocs-x.x.x.tgz

# change directory
$ cd smashdocs
There is smashdocs-azure-values.yaml file there, which describes SMASHDOCs
app setings, like version, keys, domain name settings, etc
Download: smashdocs-azure-values.yaml
customer:
  dnsname: customer
  shortname: customer
  domain: smashdocs.net

tags:
  mongodb-subchart: false
  minio-subchart: false

replicaCount: 1

frontend:
  name: frontend
  mode: normal
  image:
    repository: registry.smashdocs.net/smashdocs/frontend
    tag: 2.25.4

adminui:
  enabled: true
  name: adminui
  image:
    repository: registry.smashdocs.net/smashdocs/admin-ui
    tag: 2.25.4

backend:
  name: backend
  command: backend
  provisioningKey: 12345
  image:
    repository: registry.smashdocs.net/smashdocs/backend
    tag: 2.25.4
    pullPolicy: Always
  systemRole: development

email:
  smtpServerAddress: email-smtp.eu-west-1.amazonaws.com
  smtpServerPort: 587
  smtpUsername: smtpUsername
  smtpPassword: smtpPassword
  email: no-reply@smashdocs.net
  from: "SMASHDOCs Team"

socketserver:
  name: socketserver
  image:
    repository: registry.smashdocs.net/smashdocs/socketserver
    tag: 2.25.4

worker:
  name: worker
  command: worker

beat:
  name: beat
  command: beat

nginx:
  name: nginx
  image:
    repository: registry.smashdocs.net/smashdocs/nginx
    tag: 2.25.4
    pullPolicy: Always

spellcheck:
  enabled: true
  name: spellcheck
  image:
    repository: registry.smashdocs.net/smashdocs/spellcheck
    tag: 2.25.4

languagetool:
   name: languagetool
   image:
     repository: registry.smashdocs.net/smashdocs/languagetool
     tag: 5.9

redis:
  name: redis
  image:
    repository: redis
    tag: 7-alpine

mongodb:
  enabled: true
  name: mongodb
  image:
    repository: mongo
    tag: 6.0
    pullPolicy: IfNotPresent
  persistentVolume:
    size: 10Gi
    storageClass: azure-disk

minio:
  enabled: true
  name: minio
  accessKey: 12345
  secretKey: 12345678
  image:
    repository: "registry.smashdocs.net/smashdocs/minio:latest"
    tag: latest
    pullPolicy: IfNotPresent
  persistentVolume:
    size: 10Gi
    storageClass: azure-disk

resources: {}
  # We usually recommend not to specify default resources and to leave this as a conscious
  # choice for the user. This also increases chances charts run on environments with little
  # resources, such as Minikube. If you do want to specify resources, uncomment the following
  # lines, adjust them as necessary, and remove the curly braces after 'resources:'.
  # limits:
  #  cpu: 100m
  #  memory: 128Mi
  # requests:
  #  cpu: 100m
  #  memory: 128Mi

nodeSelector: {}

tolerations: []

affinity: {}
You will need to review and edit this file, replacing following values:
provisioningKey - mandatory value, used internally for frontend-backend authentication, can be generated by python one-liner, requires
pythoninstalled in system
$ python -c "import random; print(random.randint(5,1000000))" | shasum -a 256 | awk '{print $1}'
2ae777842419e4ab1691655b3db1625412b816e8af70573378b32c81882cc13c
place it in your smashdocs-values.yaml file, replacing
provisioningKey default value
backend:
  name: backend
  provisioningKey: 2ae777842419e4ab1691655b3db1625412b816e8af70573378b32c81882cc13c
  image:
    repository: registry.smashdocs.net/smashdocs/backend
    tag: 2.12.1
dnsname - first word in fully qualified domain name,
azurein our caseshortname - used in chart internally, equals to dnsname without dashes in name,
azurein our casedomain name - customer domain,
smashdocs.net
customer:
  dnsname: azure
  shortname: azure
  domain: smashdocs.net
email settings - server name, user name, password - outgoing email, user confirmation during registration
default values - SMASHDOCs AWS SES credentials
Optional values:
SMASHDOCs frontend and backend components can report runtime errors to
Sentry, the following chart values need to be enabled in sentry
section:
sentry:
  enabled: true
  sentyURL: https://54a7890c3aa9457688c6560eb77bb28b:fffa5d77bd59403791ea038247d9cd36@sentry.io/278077
  serverName: azure-smashdocs-backend
enabled-
trueorfalsesentryURL - Sentry project DSN URL, like
https://54a7890c3aa9457688c6560eb77bb28b@sentry.io/278077serverName - component name for Sentry reporting, default is
shortname-frontendorshortname-backend
Now, we need to create kubernetes secret with docker login credentials, we use hub.docker.com, for private docker image registry, you can request your existing docker login to be linked, as our partner, for image pull.
# create kubernetes docker login secret in given namespace with given credentials
kubectl -n azure create secret docker-registry smashdocs-dockerlogin --docker-username=YOURLOGIN --docker-password=YOURPASSWORD --docker-email=your@email.com
Now we are ready to install SMASHDOCs app into your k8s cluster. Following command will check configuration and deployment files syntax. It will output k8s deployment yaml files, but no objects will be created.
# check install, dry run
$ helm install --dry-run --name azure --namespace azure -f azure-values.yaml .
Now, let’s install SMASHDOCs app from helm chart, to namespace
azure with app settings (values) defined in
azure-values.yaml
# install SMASHDOCs app
$ helm install --name azure --namespace azure -f  azure-values.yaml .

# list installed releases
$ helm list

NAME            REVISION    UPDATED                     STATUS      CHART                       NAMESPACE
azure           6           Fri Jun  1 08:55:05 2018    DEPLOYED    smashdocs-0.1.0             azure
bumptious-sheep 1           Fri May 11 13:32:28 2018    DEPLOYED    kube-lego-0.4.0             default
zeroed-markhor  1           Fri May 25 15:03:40 2018    DEPLOYED    nginx-ingress-0.19.2        kube-system

# get running pods in namespace = 'azure', it's freshly installed SMASHDOCs app
$ kubectl -n azure get pods
NAME                                            READY     STATUS              RESTARTS   AGE
azure-adminui-5f59b78468-p987n        1/1       Running             0          <invalid>
azure-backend-7b6769474b-xzcpt        0/1       ContainerCreating   0          <invalid>
azure-beat-756549df5b-tmqrw           0/1       ContainerCreating   0          <invalid>
azure-frontend-6cdb5df48d-mcm6v       1/1       Running             0          <invalid>
azure-mongodb-85b76bdd85-fxfrn        0/1       Pending             0          <invalid>
azure-nginx-6cd6c7c784-cjj5x          1/1       Running             0          <invalid>
azure-redis-f45f6d49c-nhwhz           0/1       PodInitializing     0          <invalid>
azure-socketserver-559f4ffcbb-w7948   0/1       ContainerCreating   0          <invalid>
azure-worker-7cccccf465-l542h         0/1       ContainerCreating   0          <invalid>

# wait a few minutes, while Azure will create volumes and attach them to containers
$ kubectl get pods -n azure

NAME                                          READY     STATUS    RESTARTS   AGE
azure-adminui-5f59b78468-p987n        1/1       Running   0          3m
azure-backend-7b6769474b-xzcpt        0/1       Running   0          3m
azure-beat-756549df5b-tmqrw           1/1       Running   0          3m
azure-frontend-6cdb5df48d-mcm6v       1/1       Running   0          3m
azure-mongodb-85b76bdd85-fxfrn        1/1       Running   0          3m
azure-nginx-6cd6c7c784-cjj5x          1/1       Running   0          3m
azure-redis-f45f6d49c-nhwhz           1/1       Running   0          3m
azure-socketserver-559f4ffcbb-w7948   1/1       Running   0          3m
azure-worker-7cccccf465-l542h         1/1       Running   0          3m
App component statuses:
READY 0/1 - app component is up, but readinessProbe is not OK yet READY
READY 1/1 - app component is up and running, readinessProbe is OK
First initialization for backend component may take some time, because Azure network attached storages with ReadWriteMany mode are slow.
Open azure.smashdocs.net in browser
Congratulations, you have SMASHDOCs running in Azure cloud!
Debug option: you can add --debug to helm command while
installing/upgrading release
Upgrade SMASHDOCs app
Review CHANGELOG in helm chart directory, look for steps you need to complete before pgrade
# change current directory to one, that contains smashdocs chart
$ cd smashdocs_chart_directory

# list releases, look for smashdocs-x.x.x in CHART column
$ helm list

# upgrade SMASHDOCs release
$ helm upgrade -f azure-values.yaml RELEASE_NAME .
Troubleshooting
Get namespaces list
$ kubectl get namespaces
NAME            STATUS    AGE
azure           Active    31d
default         Active    36d
ingress-nginx   Active    36d
kube-public     Active    36d
kube-system     Active    36d
Display pods in given namespace
$ kubectl get pods -n azure
Describe pod lifecycle, look for pod events
$ kubectl -n azure describe pod azure-mongodb-85b76bdd85-fxfrn
...
Events:
  Type     Reason                 Age              From                               Message
  ----     ------                 ----             ----                               -------
  Warning  FailedScheduling       4m (x7 over 5m)  default-scheduler                  PersistentVolumeClaim is not bound: "azure-mongodb" (repeated 2 times)
  Normal   Scheduled              4m               default-scheduler                  Successfully assigned azure-mongodb-85b76bdd85-fxfrn to aks-nodepool1-24768417-1
  Normal   SuccessfulMountVolume  4m               kubelet, aks-nodepool1-24768417-1  MountVolume.SetUp succeeded for volume "default-token-d7zdh"
  Warning  FailedMount            1m               kubelet, aks-nodepool1-24768417-1  Unable to mount volumes for pod "azure-mongodb-85b76bdd85-fxfrn_azure(ee0a6920-68ea-11e8-92cf-0a58ac1f0520)": timeout expired waiting for volumes to attach/mount for pod "azure"/"azure-mongodb-85b76bdd85-fxfrn". list of unattached/unmounted volumes=[mongodb-data]
  Normal   SuccessfulMountVolume  1m               kubelet, aks-nodepool1-24768417-1  MountVolume.SetUp succeeded for volume "pvc-edc6720e-68ea-11e8-92cf-0a58ac1f0520"
  Normal   Pulling                1m               kubelet, aks-nodepool1-24768417-1  pulling image "mongo:4.4"
  Normal   Pulled                 48s              kubelet, aks-nodepool1-24768417-1  Successfully pulled image "mongo:4.4"
  Normal   Created                48s              kubelet, aks-nodepool1-24768417-1  Created container
  Normal   Started                48s              kubelet, aks-nodepool1-24768417-1  Started container
Get pod logs from stdout/stder (nginx, frontend, backend, socketserver)
$ kubectl -n azure log azure-backend-7b6769474b-xzcpt
 ...
 [backend logs here]
Check storage classes
$ kubectl get sc
NAME                PROVISIONER                AGE
azure-disk          kubernetes.io/azure-disk   6h

$ kubectl describe sc azure-disk
Name:                  azure-disk
IsDefaultClass:        No
Annotations:           <none>
Provisioner:           kubernetes.io/azure-disk
Parameters:            cachingmode=None,kind=Managed,skuName=Standard_LRS
AllowVolumeExpansion:  <unset>
MountOptions:
  dir_mode=0777
  file_mode=0777
ReclaimPolicy:      Retain
VolumeBindingMode:  Immediate
Events:             <none>
Check persistent volume claims, and persistent volume status, Status Bound is OK
$ kubectl -n azure get pv,pvc
NAME                                                        CAPACITY   ACCESS MODES   RECLAIM POLICY   STATUS     CLAIM                             STORAGECLASS   REASON   AGE
persistentvolume/pvc-2003bef6-ec30-11e8-87ec-0a58ac1f027c   10Gi       RWO            Retain           Bound      azure/azure-smashdocs-minio       azure-disk              2y56d
persistentvolume/pvc-e0436dba-ec2e-11e8-87ec-0a58ac1f027c   10Gi       RWO            Retain           Bound      azure/azure-smashdocs-mongodb     azure-disk              2y56d

NAME                                            STATUS   VOLUME                                     CAPACITY   ACCESS MODES   STORAGECLASS   AGE
persistentvolumeclaim/azure-smashdocs-minio     Bound    pvc-2003bef6-ec30-11e8-87ec-0a58ac1f027c   10Gi       RWO            azure-disk     2y52d
persistentvolumeclaim/azure-smashdocs-mongodb   Bound    pvc-e0436dba-ec2e-11e8-87ec-0a58ac1f027c   10Gi       RWO            azure-disk     2y52d
Delete stuck in Terminating status pods
kubectl get pods --all-namespaces | awk -v ns="YOUR_NAMESPACE" '$3=="Terminating" {print "kubectl delete -n "ns" pod " $2 " --grace-period=0 --force"}' | xargs -0 bash -c
Access pods within k8s cluster
Let’s assume that our release is named azure-smashdocs, it’s running in azure namespace,
and we need to get access to mongo database, this can be done by kubectl port-forwarding
Please change azure to YOUR_NAMESPACE when executing command from example given below:
# list installed releases, to find out proper namespace
$ helm list
NAME                 REVISION        UPDATED                         STATUS          CHART                   NAMESPACE
azure-smashdocs      166             Tue Jul 10 17:46:02 2018        DEPLOYED        smashdocs-0.2.0         azure

# OR
$ kubectl get namespaces
NAME            STATUS    AGE
azure           Active    28d
default         Active    33d
ingress-nginx   Active    33d
kube-public     Active    33d
kube-system     Active    33d

# so, our components are running in 'azure' namespace,
$ kubectl -n azure get svc
NAME                         TYPE        CLUSTER-IP     EXTERNAL-IP   PORT(S)     AGE
azure-adminui        ClusterIP   10.0.172.143   <none>        80/TCP      1h
azure-backend        ClusterIP   10.0.187.210   <none>        8080/TCP    3h
azure-beat           ClusterIP   10.0.169.224   <none>        8080/TCP    3h
azure-frontend       ClusterIP   10.0.108.36    <none>        80/TCP      3h
azure-mongodb        ClusterIP   10.0.23.47     <none>        27017/TCP   3h
azure-nginx          ClusterIP   10.0.109.157   <none>        80/TCP      3h
azure-redis          ClusterIP   10.0.159.33    <none>        6379/TCP    3h
azure-socketserver   ClusterIP   10.0.233.101   <none>        8080/TCP    3h
azure-worker         ClusterIP   10.0.193.207   <none>        8080/TCP    3h

# forward local 37017 to remote service azure-mongodb port 27017
$ kubectl -n azure port-forward svc/azure-mongodb 37017:27017
Forwarding from 127.0.0.1:37017 -> 27017
Forwarding from [::1]:37017 -> 27017
Now you can connect with MongoHUB or Studio3T or mongodb cli to localhost:37017, and that connect will be forwarded to mongodb pod inside cluster.
Delete SMASHDOCs release
WARNING - DESTRUCTIVE actions
delete SMASHDOCs k8s release
helm delete RELEASE_NAME
delete k8s cluster from AKS
az aks delete -n k8s-cc-test -g k8s-cc-gr
Kubernetes setup for AWS (kops)
This guide describes Kubernetes cluster provisioning using KOPS and following SMASHDOCs app install on this cluster (k8s) cluster.
The main architectural considerations are:
all SMASHDOCs app components: frontend, adminui, backend, socketserver, beat, worker, nginx, redis, mongodb are running in k8s cluster
one k8s pod is running one SMASHDOCs app component
one k8s service is created for each SMASHDOCs app component
nginx ingress controller is used for http/https termination
kube-lego is used for SSL certificate generation
persistent data stored at AWS EBS storage
At the end of this guide you will have working instance of SMASHDOCs app in AWS cloud with public HTTPS access.
Install CLI utilities
The following prerequisites are required for installing KOPS
aws- AWS CLI utilitykubectl- Kubernetes CLI utilitykops- KOPS CLI utilityhelm- Kubernetes package manager clientjq- JSON parsing utility
Step to install on MacOS:
$ brew install aws-cli
$ brew install kubernetes-cli
$ brew install kops
$ brew install kubernetes-helm
$ brew install jq
in Linux use appropriate package manager, apt/yum
Prerequisite steps
If your AWS account is not empty, and you don’t want to mix existing AWS resources with resources, which will be created by kops, create new sub-account in your organization. Login to your AWS account, go to Organizations menu, select add account, enter email, add new organizational unit, assign permissions for newly created account, it must have full access to organizational unit. Switch role from your root account to new one.
Choose domain name for your k8s cluster, it will be used later in AWS/k8s resources creation, we will use
aws.smashdocs.net in this guide as domain name
Go to IAM, create kops group with following permissions
AmazonEC2FullAccess
AmazonRoute53FullAccess
AmazonS3FullAccess
IAMFullAccess
AmazonVPCFullAccess
Create kops user, add it to kops group, generate AWS_ACCESS_KEY_ID and AWS_SECRET_ACCESS_KEY and configure aws profile kops using those credentials.
aws configure --profile kops
AWS Access Key ID [None]: YOUR_AWS_ACCESS_KEY_ID
AWS Secret Access Key [None]: YOUR_AWS_SECRET_ACCESS_KEY
Default region name [None]: YOUR_AWS_REGION
Default output format [None]:
Create S3 bucket where kops state will be stored, we will use bucket name aws-smashdocs-net-kops-state-store in this guide
aws s3api create-bucket \
--bucket aws-eu-smashdocs-io-kops-state-store --region eu-central-1 \
--create-bucket-configuration LocationConstraint=eu-central-1
Enable versioning for this bucket
aws s3api put-bucket-versioning --bucket  aws-eu-smashdocs-io-kops-state-store \
--versioning-configuration Status=Enabled
Create K8S in AWS
Set cluster name
export NAME=aws.smashdocs.net
export KOPS_STATE_STORE=s3://aws-smashdocs-net-kops-state-store
List and set availibility zones for cluster
aws ec2 describe-availability-zones --region eu-central-1

export ZONES="eu-central-1a"

export ZONES="eu-central-1a eu-central-1b eu-central-1c"
Choose node size for masters and workers
export NODE_SIZE=t2.large
export MASTER_SIZE=m3.medium
Generate cluster manifests
kops create cluster $NAME \
--node-count 1 \
--zones $ZONES \
--node-size $NODE_SIZE \
--master-size $MASTER_SIZE \
--master-zones $ZONES \
--networking calico \
--authorization RBAC --dry-run --output yaml | tee $NAME.k8s.yaml
Review generated manifests, create cluster, create secret for access, validate cluster
kops create -f $NAME.k8s.yaml
kops create secret --name $NAME sshpublickey admin -i ~/.ssh/id_rsa.pub
kops update cluster --yes
kops validate cluster
Get k8s cluster credentials
To use k8s cluster we need to get it’s credentials (certificates), this
command will put it in kubectl config located at
$HOME/.kube/config
With kops credentials will be put in your kubeconfig on cluster creation
# view available contexts
$ kubectl config get-contexts
*         aws.smashdocs.net    aws.smashdocs.net    aws.smashdocs.net

# use specified context
$ kubectl config use-context aws.smashdocs.net
Switched to context "aws.smashdocs.net".

# view cluster nodes
$ kubectl get nodes
NAME                       STATUS    ROLES     AGE       VERSION
ip-172-20-124-62.eu-central-1.compute.internal   Ready    node     1h    v1.11.6
ip-172-20-49-115.eu-central-1.compute.internal   Ready    master   1h    v1.11.6

# view cluster pods (containers)
$ kubectl get pods --all-namespaces
NAMESPACE     NAME                                    READY     STATUS    RESTARTS   AGE
[output skipped]
# view cluster info
$ kubectl cluster-info
[output skipped]
To further debug and diagnose cluster problems, use 'kubectl cluster-info dump'.
Status Ready is OK, now nodes can take workloads.
Kubernetes storage class provisioning
SMASHDOCs app requires persistent storage, so StorageClass must be provisioned in k8s cluster,
kops is using gp2 (default) with kubernetes.io/aws-ebs provisioner by default.
kubectl get sc
NAME            PROVISIONER             AGE
default         kubernetes.io/aws-ebs   7d
gp2 (default)   kubernetes.io/aws-ebs   7d
standard        kubernetes.io/aws-ebs   7d
Initialize k8s package manager - helm
Initialize kubernetes package manager helm server-side part, which
is called tiller, empty output is OK, it means no releases have been
installed by helm in k8s yet.
# initialize server-side pod, tiller


# wait a few moments, before server-side initialization is finished
# upgrade tiller to latest version


# show helm-deployed releases
$ helm list -A

# empty output excepted, we didn't deploy anything by helm yet
$
Create k8s ingress
The standard way to receive incoming traffic in k8s is through special
component, provisioned by creating Ingress object
Install nginx k8s ingress controller to ingress-nginx namespace, with RBAC enabled
# install nginx helm chart
$ helm install stable/nginx-ingress --namespace ingress-nginx
Ingress deployment will create AWS LoadBalancer, pointing to newly
created k8s cluster, we need to find out it’s public IP, and create DNS
A record - aws.smashdocs.net in our case.
Execute following command and look for EXTERNAL-IP address - it will
be first, but later will be like 52.58.70.14 - this is AWS load
balancer public IP address, this operation may take a few minutes to
complete.
$ kubectl get service  -n ingress-nginx -l app=nginx-ingress
NAME                                                TYPE           CLUSTER-IP     EXTERNAL-IP     PORT(S)                      AGE
irreverant-ladybird-nginx-ingress-controller        LoadBalancer   10.0.162.217   52.58.70.14   80:31933/TCP,443:30924/TCP   13d
Let’s assume, we want to deploy SMASHDOCs app to https://aws.smashdocs.net
Create DNS A-record pointing to EXTERNAL-IP, in our case we’ve created
aws.smashdocs.net with value 52.58.70.14
Verify that DNS provisioned correctly and k8s is working - try to open
your URL in browser or by CLI utility like curl, the following
output is expected
default backend - 404
Install all cert-manager components
Link: https://cert-manager.io/docs/installation/kubectl/
kubectl apply -f https://github.com/cert-manager/cert-manager/releases/download/v1.10.1/cert-manager.yaml
You can view some of the resources that have been installed as follows:
kubectl -n cert-manager get all
Issuer Configuration
Link: https://cert-manager.io/docs/configuration/ https://cert-manager.io/docs/tutorials/getting-started-with-cert-manager-on-google-kubernetes-engine-using-lets-encrypt-for-ingress-ssl/#7-create-an-issuer-for-lets-encrypt-staging
The first thing you’ll need to configure after you’ve installed cert-manager is an Issuer or a ClusterIssuer. Save the following content to a file called issuer-lets-encrypt.yaml, change the email field to use your email address and apply it:
# issuer-lets-encrypt.yaml
apiVersion: v1
kind: List
items:
- apiVersion: cert-manager.io/v1
  kind: ClusterIssuer
  metadata:
    name: letsencrypt-prod
  spec:
    acme:
      email: email@mail.net ❗ Replace this with your email address
      privateKeySecretRef:
        name: letsencrypt-prod
      server: https://acme-v02.api.letsencrypt.org/directory
      solvers:
      - http01:
          ingress:
            class: nginx
kubectl apply -f issuer-lets-encrypt.yaml
Install SMASHDOCs app
SMASHDOCs app can be deployed using helm chart - the templates collecton, which describes k8s components like deployments, services, volumes, configmaps, ingress, etc.
One of possible ways to organize resources (deployments, pods, volumes) in kubernetes by using namespaces. One of recommendations is to have one namespace per application.
Let’s choose namespace name - we will use aws and k8s release
name, we will use aws
Release name is optional, will be assigned to random word1-word2 value,
if not specified, can be looked up later by running helm list
SMASHDOCs helm chart can be downloaded from our public repo - https://bitbucket.org/smashdocs/helm-chart/src/master/
Actual chart content (deployment templates)located in chart archive smashdocs-x.x.x.tgz,
download, extract files, then we need to change install-specific settings, change current directory
# untar archive
$ tar zxvf smashdocs-x.x.x.tgz

# change directory
$ cd smashdocs
There is smashdocs-aws-values.yaml file there, which describes SMASHDOCs
app setings, like version, keys, domain name settings, etc
Download: smashdocs-aws-values.yaml
customer:
  dnsname: customer
  shortname: customer
  domain: smashdocs.net

tags:
  mongodb-subchart: false
  minio-subchart: false

replicaCount: 1

frontend:
  name: frontend
  mode: normal
  image:
    repository: registry.smashdocs.net/smashdocs/frontend
    tag: 2.25.4

adminui:
  enabled: true
  name: adminui
  image:
    repository: registry.smashdocs.net/smashdocs/admin-ui
    tag: 2.25.4

backend:
  name: backend
  command: backend
  provisioningKey: 12345
  image:
    repository: registry.smashdocs.net/smashdocs/backend
    tag: 2.25.4
    pullPolicy: Always
  systemRole: development

email:
  smtpServerAddress: email-smtp.eu-west-1.amazonaws.com
  smtpServerPort: 587
  smtpUsername: smtpUsername
  smtpPassword: smtpPassword
  email: no-reply@smashdocs.net
  from: "SMASHDOCs Team"

socketserver:
  name: socketserver
  image:
    repository: registry.smashdocs.net/smashdocs/socketserver
    tag: 2.25.4

worker:
  name: worker
  command: worker

beat:
  name: beat
  command: beat

nginx:
  name: nginx
  image:
    repository: registry.smashdocs.net/smashdocs/nginx
    tag: 2.25.4
    pullPolicy: Always

spellcheck:
  enabled: true
  name: spellcheck
  image:
    repository: registry.smashdocs.net/smashdocs/spellcheck
    tag: 2.25.4

languagetool:
   name: languagetool
   image:
     repository: registry.smashdocs.net/smashdocs/languagetool
     tag: 5.9

redis:
  name: redis
  image:
    repository: redis
    tag: 7-alpine

mongodb:
  enabled: true
  name: mongodb
  image:
    repository: mongo
    tag: 6.0
    pullPolicy: IfNotPresent
  persistentVolume:
    size: 10Gi
    storageClass: azure-disk

minio:
  enabled: true
  name: minio
  accessKey: 12345
  secretKey: 12345678
  image:
    repository: "registry.smashdocs.net/smashdocs/minio:latest"
    tag: latest
    pullPolicy: IfNotPresent
  persistentVolume:
    size: 10Gi
    storageClass: default

resources: {}
  # We usually recommend not to specify default resources and to leave this as a conscious
  # choice for the user. This also increases chances charts run on environments with little
  # resources, such as Minikube. If you do want to specify resources, uncomment the following
  # lines, adjust them as necessary, and remove the curly braces after 'resources:'.
  # limits:
  #  cpu: 100m
  #  memory: 128Mi
  # requests:
  #  cpu: 100m
  #  memory: 128Mi

nodeSelector: {}

tolerations: []

affinity: {}
You will need to review and edit this file, replacing following values:
provisioningKey - mandatory value, used internally for frontend-backend authentication, can be generated by python one-liner, requires
pythoninstalled in system
$ python -c "import random; print(random.randint(5,1000000))" | shasum -a 256 | awk '{print $1}'
2ae777842419e4ab1691655b3db1625412b816e8af70573378b32c81882cc13c
place it in your smashdocs-aws-values.yaml file, replacing
provisioningKey default value
backend:
  name: backend
  provisioningKey: 2ae777842419e4ab1691655b3db1625412b816e8af70573378b32c81882cc13c
  image:
    repository: registry.smashdocs.net/smashdocs/backend
    tag: 2.25.4
dnsname - first word in fully qualified domain name,
azurein our caseshortname - used in chart internally, equals to dnsname without dashes in name,
awsin our casedomain name - customer domain,
smashdocs.net
customer:
  dnsname: aws
  shortname: aws
  domain: smashdocs.net
email settings - server name, user name, password - outgoing email, user confirmation during registration
default values - SMASHDOCs AWS SES credentials
Optional values:
SMASHDOCs frontend and backend components can report runtime errors to
Sentry, the following chart values need to be enabled in sentry
section:
sentry:
  enabled: true
  sentyURL: https://54a7890c3aa9457688c6560eb77bb28b:fffa5d77bd59403791ea038247d9cd36@sentry.io/278077
  serverName: smashdocs-backend
enabled-
trueorfalsesentryURL - Sentry project DSN URL, like
https://54a7890c3aa9457688c6560eb77bb28b@sentry.io/278077serverName - component name for Sentry reporting, default is
shortname-frontendorshortname-backend
Now, we need to create kubernetes secret with docker login credentials, we use hub.docker.com, for private docker image registry, you can request your existing docker login to be linked, as our partner, for image pull.
# create kubernetes docker login secret in given namespace with given credentials
kubectl -n aws create secret docker-registry smashdocs-dockerlogin --docker-username=YOURLOGIN --docker-password=YOURPASSWORD --docker-email=your@email.com
Now we are ready to install SMASHDOCs app into your k8s cluster. Following command will check configuration and deployment files syntax. It will output k8s deployment yaml files, but no objects will be created.
# check install, dry run
$ helm install --dry-run --name aws --namespace aws -f smashdocs-aws-values.yaml .
Now, let’s install SMASHDOCs app from helm chart, to namespace
aws with app settings (values) defined in
smashdocs-aws-values.yaml
# install SMASHDOCs app
$ helm install --name aws --namespace aws -f  smashdocs-aws-values.yaml .

# list installed releases
$ helm list

NAME            REVISION    UPDATED                     STATUS      CHART                       NAMESPACE
aws             6           Fri Jun  1 08:55:05 2018    DEPLOYED    smashdocs-0.4.3             aws
bumptious-sheep 1           Fri May 11 13:32:28 2018    DEPLOYED    kube-lego-0.4.0             default
zeroed-markhor  1           Fri May 25 15:03:40 2018    DEPLOYED    nginx-ingress-0.19.2        kube-system

# get running pods in namespace = 'aws', it's freshly installed SMASHDOCs app
$ kubectl -n aws get pods
NAME                                            READY     STATUS              RESTARTS   AGE
aws-adminui-5f59b78468-p987n        1/1       Running             0          <invalid>
aws-backend-7b6769474b-xzcpt        0/1       ContainerCreating   0          <invalid>
aws-beat-756549df5b-tmqrw           0/1       ContainerCreating   0          <invalid>
aws-frontend-6cdb5df48d-mcm6v       1/1       Running             0          <invalid>
aws-mongodb-85b76bdd85-fxfrn        0/1       Pending             0          <invalid>
aws-nginx-6cd6c7c784-cjj5x          1/1       Running             0          <invalid>
aws-redis-f45f6d49c-nhwhz           0/1       PodInitializing     0          <invalid>
aws-socketserver-559f4ffcbb-w7948   0/1       ContainerCreating   0          <invalid>
aws-worker-7cccccf465-l542h         0/1       ContainerCreating   0          <invalid>

# wait a few minutes, while aws will create volumes and attach them to containers
$ kubectl get pods -n aws

NAME                                          READY     STATUS    RESTARTS   AGE
aws-adminui-5f59b78468-p987n        1/1       Running   0          3m
aws-backend-7b6769474b-xzcpt        0/1       Running   0          3m
aws-beat-756549df5b-tmqrw           1/1       Running   0          3m
aws-frontend-6cdb5df48d-mcm6v       1/1       Running   0          3m
aws-mongodb-85b76bdd85-fxfrn        1/1       Running   0          3m
aws-nginx-6cd6c7c784-cjj5x          1/1       Running   0          3m
aws-redis-f45f6d49c-nhwhz           1/1       Running   0          3m
aws-socketserver-559f4ffcbb-w7948   1/1       Running   0          3m
aws-worker-7cccccf465-l542h         1/1       Running   0          3m
App component statuses:
READY 0/1 - app component is up, but readinessProbe is not OK yet READY
READY 1/1 - app component is up and running, readinessProbe is OK
Open aws.smashdocs.net in browser
Congratulations, you have SMASHDOCs running in AWS cloud!
Debug option: you can add --debug to helm command while
installing/upgrading release
Upgrade SMASHDOCs app
Review CHANGELOG in helm chart directory, look for steps you need to complete before pgrade
# change current directory to one, that contains smashdocs chart
$ cd smashdocs_chart_directory

# list releases, look for smashdocs-x.x.x in CHART column
$ helm list

# upgrade SMASHDOCs release
$ helm upgrade -f smashdocs-aws-values.yaml RELEASE_NAME .
Troubleshooting
Get namespaces list
$ kubectl get namespaces
NAME            STATUS    AGE
azure           Active    31d
default         Active    36d
ingress-nginx   Active    36d
kube-public     Active    36d
kube-system     Active    36d
Display pods in given namespace
$ kubectl get pods -n azure
Describe pod lifecycle, look for pod events
$ kubectl -n azure describe pod azure-mongodb-85b76bdd85-fxfrn
...
Events:
  Type     Reason                 Age              From                               Message
  ----     ------                 ----             ----                               -------
  Warning  FailedScheduling       4m (x7 over 5m)  default-scheduler                  PersistentVolumeClaim is not bound: "azure-mongodb" (repeated 2 times)
  Normal   Scheduled              4m               default-scheduler                  Successfully assigned azure-mongodb-85b76bdd85-fxfrn to aks-nodepool1-24768417-1
  Normal   SuccessfulMountVolume  4m               kubelet, aks-nodepool1-24768417-1  MountVolume.SetUp succeeded for volume "default-token-d7zdh"
  Warning  FailedMount            1m               kubelet, aks-nodepool1-24768417-1  Unable to mount volumes for pod "azure-mongodb-85b76bdd85-fxfrn_azure(ee0a6920-68ea-11e8-92cf-0a58ac1f0520)": timeout expired waiting for volumes to attach/mount for pod "azure"/"azure-mongodb-85b76bdd85-fxfrn". list of unattached/unmounted volumes=[mongodb-data]
  Normal   SuccessfulMountVolume  1m               kubelet, aks-nodepool1-24768417-1  MountVolume.SetUp succeeded for volume "pvc-edc6720e-68ea-11e8-92cf-0a58ac1f0520"
  Normal   Pulling                1m               kubelet, aks-nodepool1-24768417-1  pulling image "mongo:4.4"
  Normal   Pulled                 48s              kubelet, aks-nodepool1-24768417-1  Successfully pulled image "mongo:4.4"
  Normal   Created                48s              kubelet, aks-nodepool1-24768417-1  Created container
  Normal   Started                48s              kubelet, aks-nodepool1-24768417-1  Started container
Get pod logs from stdout/stder (nginx, frontend, backend, socketserver)
$ kubectl -n azure log azure-backend-7b6769474b-xzcpt
 ...
 [backend logs here]
Check storage classes
$ kubectl get sc
NAME                PROVISIONER                AGE
azure-disk          kubernetes.io/azure-disk   6h

$ kubectl describe sc azure-disk
Name:                  azure-disk
IsDefaultClass:        No
Annotations:           <none>
Provisioner:           kubernetes.io/azure-disk
Parameters:            cachingmode=None,kind=Managed,skuName=Standard_LRS
AllowVolumeExpansion:  <unset>
MountOptions:
  dir_mode=0777
  file_mode=0777
ReclaimPolicy:      Retain
VolumeBindingMode:  Immediate
Events:             <none>
Check persistent volume claims, and persistent volume status, Status Bound is OK
$ kubectl -n azure get pv,pvc
persistentvolume/pvc-2003bef6-ec30-11e8-87ec-0a58ac1f027c   10Gi       RWO            Retain           Bound      azure/azure-smashdocs-minio       azure-disk              2y56d
persistentvolume/pvc-e0436dba-ec2e-11e8-87ec-0a58ac1f027c   10Gi       RWO            Retain           Bound      azure/azure-smashdocs-mongodb     azure-disk              2y56d

NAME                                            STATUS   VOLUME                                     CAPACITY   ACCESS MODES   STORAGECLASS   AGE
persistentvolumeclaim/azure-smashdocs-minio     Bound    pvc-2003bef6-ec30-11e8-87ec-0a58ac1f027c   10Gi       RWO            azure-disk     2y52d
persistentvolumeclaim/azure-smashdocs-mongodb   Bound    pvc-e0436dba-ec2e-11e8-87ec-0a58ac1f027c   10Gi       RWO            azure-disk     2y52d
Delete stuck in Terminating status pods
kubectl get pods --all-namespaces | awk -v ns="YOUR_NAMESPACE" '$3=="Terminating" {print "kubectl delete -n "ns" pod " $2 " --grace-period=0 --force"}' | xargs -0 bash -c
Access pods within k8s cluster
Let’s assume that our release is named azure-smashdocs, it’s running in azure namespace,
and we need to get access to mongo database, this can be done by kubectl port-forwarding
Please change azure to YOUR_NAMESPACE when executing command from example given below:
# list installed releases, to find out proper namespace
$ helm list
NAME                 REVISION        UPDATED                         STATUS          CHART                   NAMESPACE
azure-smashdocs      166             Tue Jul 10 17:46:02 2018        DEPLOYED        smashdocs-0.2.0         azure

# OR
$ kubectl get namespaces
NAME            STATUS    AGE
azure           Active    28d
default         Active    33d
ingress-nginx   Active    33d
kube-public     Active    33d
kube-system     Active    33d

# so, our components are running in 'azure' namespace,
$ kubectl -n azure get svc
NAME                         TYPE        CLUSTER-IP     EXTERNAL-IP   PORT(S)     AGE
azure-adminui        ClusterIP   10.0.172.143   <none>        80/TCP      1h
azure-backend        ClusterIP   10.0.187.210   <none>        8080/TCP    3h
azure-beat           ClusterIP   10.0.169.224   <none>        8080/TCP    3h
azure-frontend       ClusterIP   10.0.108.36    <none>        80/TCP      3h
azure-mongodb        ClusterIP   10.0.23.47     <none>        27017/TCP   3h
azure-nginx          ClusterIP   10.0.109.157   <none>        80/TCP      3h
azure-redis          ClusterIP   10.0.159.33    <none>        6379/TCP    3h
azure-socketserver   ClusterIP   10.0.233.101   <none>        8080/TCP    3h
azure-worker         ClusterIP   10.0.193.207   <none>        8080/TCP    3h

# forward local 37017 to remote service azure-mongodb port 27017
$ kubectl -n azure port-forward svc/azure-mongodb 37017:27017
Forwarding from 127.0.0.1:37017 -> 27017
Forwarding from [::1]:37017 -> 27017
Now you can connect with MongoHUB or Studio3T or mongodb cli to localhost:37017, and that connect will be forwarded to mongodb pod inside cluster.
Delete SMASHDOCs release
WARNING - DESTRUCTIVE actions
delete SMASHDOCs k8s release
helm delete RELEASE_NAME
delete k8s cluster from AKS
az aks delete -n k8s-cc-test -g k8s-cc-gr
Multitenancy
SMASHDOCs supports multiple tenants on one installation. Each tenant in SMASHDOCs is called Organization and can be created and updated by the Provisioning API: provisioning.html
Redundant Setup
please contact us